
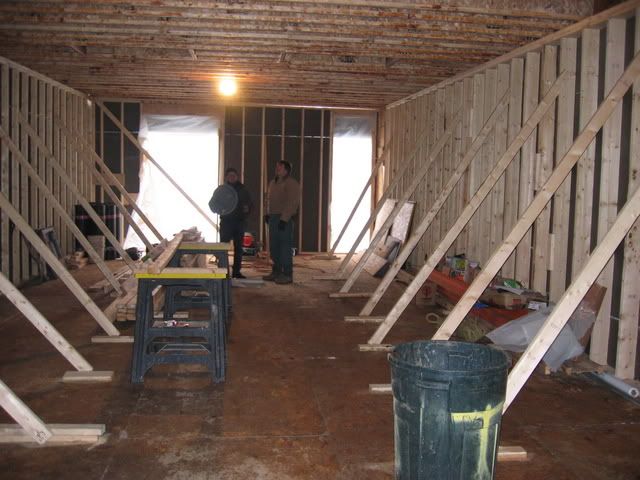
Wow... I went by the garage last night to refill the heater again (turns out this needs to be done for ten days from when the concrete was poured) and saw that the walls between the finished area on the first floor and the garage section were put up. It's amazing how much bigger everything seems after walls are up! I still can't entirely wrap my head around why divisions in a space make it seem larger, but they definitely do.
I was most impressed with the cieling height. Now that the area's a bit more narrow the fact that the cielings in the garage are going to be like 12 feet or something like that is really clear. The garage is going to seem massive!
That's all for now. I have meetings at the garage for lunch today for the HVAC and tomorrow for the bi-weekly construction meetings, so I'm sure I'll be posting new pix soon.
Tuesday, January 30, 2007
Sunday, January 28, 2007
Siding Choices...
Up till the last couple of weeks, I'd always envisioned the second floor to be covered in mill finish, plain, silver looking steel corrugated siding. Recently though, I've noticed a number of other places in the area starting to use this and it's made me reconsider. Although I like the industrial look a lot, I also don't necessarily want my house grouped in with the other new construction in the area. I started looking at alternatives this week, and found that alternate colors and patterns are not as much more as I'd thought.
I also was informed around this time that the exact material which I'd specified before would weather and eventually rust despite the fact that it's supposed to be coated not to. The whole rusting thing is awesome, but I don't want to worry about dripping rust on my neighbors properties and on mine or having to replace it if it rusts too much.
Soooo, after some research I think I'm going to be using McElroy Metals. As of right now I'm trying to decide between these two colors:


(Please note, the blue color's a bit hard to reproduce, on the computer; even the scan of the color chart that I made is off a bit)
I like the blue cause it's bold, but not overly so... though the charcoal has a cool ominuous feel to it, which I like as well. To try and get a feel for what color to use as well as what rib-pattern to use for the corrugated siding I did some photoshopping of this picture:


I think I've decided to go with a corrugation pattern that repeats every 12" as opposed to a smaller corrugation that repeats every 3". I think the larger pattern gives it more of a "large commercial building" feel as opposed to an industrial feel. My mom was concerned that only having a small number (20) of ribbed patterns going down the front would be wierd because of the way the lines would intersect with the window and door openings. I photoshopped both the small and large patterns over the front elevation plan and found that I'm happy with just a few ribs.


Well, if you're still reading at this point, then hopefully you have an opinion on which of the various things I've laid out look best. Any thoughts? Leave em in the comments if you do.
I also was informed around this time that the exact material which I'd specified before would weather and eventually rust despite the fact that it's supposed to be coated not to. The whole rusting thing is awesome, but I don't want to worry about dripping rust on my neighbors properties and on mine or having to replace it if it rusts too much.
Soooo, after some research I think I'm going to be using McElroy Metals. As of right now I'm trying to decide between these two colors:

(Please note, the blue color's a bit hard to reproduce, on the computer; even the scan of the color chart that I made is off a bit)
I like the blue cause it's bold, but not overly so... though the charcoal has a cool ominuous feel to it, which I like as well. To try and get a feel for what color to use as well as what rib-pattern to use for the corrugated siding I did some photoshopping of this picture:


I think I've decided to go with a corrugation pattern that repeats every 12" as opposed to a smaller corrugation that repeats every 3". I think the larger pattern gives it more of a "large commercial building" feel as opposed to an industrial feel. My mom was concerned that only having a small number (20) of ribbed patterns going down the front would be wierd because of the way the lines would intersect with the window and door openings. I photoshopped both the small and large patterns over the front elevation plan and found that I'm happy with just a few ribs.


Well, if you're still reading at this point, then hopefully you have an opinion on which of the various things I've laid out look best. Any thoughts? Leave em in the comments if you do.
Concrete Pouring and Kerosene Fun
The colored concrete got poured this past Wednesday after a little bit of drama. At first there was a problem because of the temperature requried by the concrete color, but in the end we've been using a kerosene "bullet" heater to keep the area above freezing temperature. It's now Sunday and I've been going down every night and during the day if the construction guys aren't there to refill the heater every 8-10 hours or so. Kerosene. Is. Smelly.
Although the concrete's hard, the full cure takes a while and you can see it clearly by the fact that the color of the concrete is still changing somewhat. Here's a picture of the concrete the night after it was poured:

I'm extremely jealous of this place which is on Sidney and 16th I think. They're using corrugated steel halfway on it's way to rusting, large painted metal panels, huge windows and are using only portions of the existing building, using the rest to define outside areas, similar to what I'm doing... tho much more impressive.

Tuesday, January 23, 2007
Whoops, Sorry Jen
Jen just made me realize I haven't yet talked about the robot room w/ pea green carpet.
Here's a sneak preview:
Here's a sneak preview:
Monday, January 22, 2007
Bigger Pictures = Better Pictures?
Anybody have an opinion on which is better:
-the small picture with a link to a hi-res version of it
or
-the medium sized pictures with no link
?
Leave em in the comments if you do.
Thnx.
Mgmt.
-the small picture with a link to a hi-res version of it
or
-the medium sized pictures with no link
?
Leave em in the comments if you do.
Thnx.
Mgmt.
It Gets a Face
January 19, 2007
Well, I've just about done it: gotten this blog up to date.
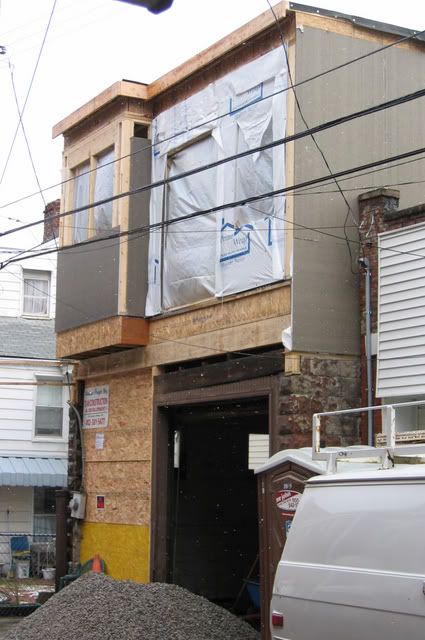
Last week the front of the house really started to get some form and the first peek at how it's going to look:
After some delays, the first floor plumbing was started. When the plumber came he found that the trap in the garage floor drain was draining slowly. The inspector who checked out the pipes before I got the place had the same problem. We decided to have him replace it for $500. I didn't really want to do that because I don't foresee myself using this drain much, but considering the drain is about to be permanently encased in concrete.... it's probably a good idea.
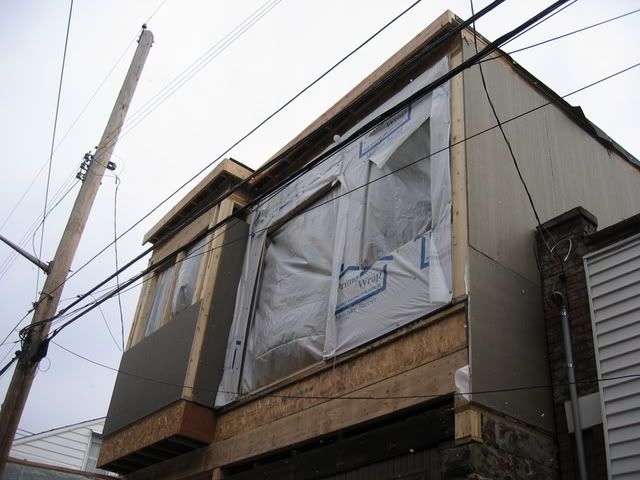
Here's the view from the front of the second floor looking towards the back:
And looking from the middle of the second floor towards the front. The right window will be part of the bathroom and sectioned off by a wall and door.
Remember the neighbors who delayed the start of construction by about 9.5 months costing me bunches of rent money and lawyer fees? Well, check out their "great view" that my house is blocking:
Ummm.... yeah, somehow I think they're gonna live.
Well, I've just about done it: gotten this blog up to date.
Last week the front of the house really started to get some form and the first peek at how it's going to look:
After some delays, the first floor plumbing was started. When the plumber came he found that the trap in the garage floor drain was draining slowly. The inspector who checked out the pipes before I got the place had the same problem. We decided to have him replace it for $500. I didn't really want to do that because I don't foresee myself using this drain much, but considering the drain is about to be permanently encased in concrete.... it's probably a good idea.
Here's the view from the front of the second floor looking towards the back:
And looking from the middle of the second floor towards the front. The right window will be part of the bathroom and sectioned off by a wall and door.
Remember the neighbors who delayed the start of construction by about 9.5 months costing me bunches of rent money and lawyer fees? Well, check out their "great view" that my house is blocking:
Ummm.... yeah, somehow I think they're gonna live.
Second Floor Walls
January 11, 2007
About a week later I stopped by the garage to see that the second floor side walls had been built and raised. It was a nice day, so of course I had to snap a pic:

About a week later I stopped by the garage to see that the second floor side walls had been built and raised. It was a nice day, so of course I had to snap a pic:

Sunday, January 21, 2007
Constructing the New Floor
January 6, 2007
When I visited to take more pictures in the new year I was happy to find that the cieling of the first floor/floor of the second floor was up and the frame wall of the second floor was built and waiting to be stood up.

This shows the cantilevered bathroom section which will bump out from the front.

Trusses for the cantilevered section go lengthwise in relation to the house, not across the width like the other beams.

The constructed roof looking from the back to the front.

This is a little video I took while on the second floor that shows some of the neighboring backyards etc.
There's a huge, old, run-down police station across the street that I talk about a bit in this video.
When I visited to take more pictures in the new year I was happy to find that the cieling of the first floor/floor of the second floor was up and the frame wall of the second floor was built and waiting to be stood up.
This is the front (obviously).

This shows the cantilevered bathroom section which will bump out from the front.

Trusses for the cantilevered section go lengthwise in relation to the house, not across the width like the other beams.

The constructed roof looking from the back to the front.

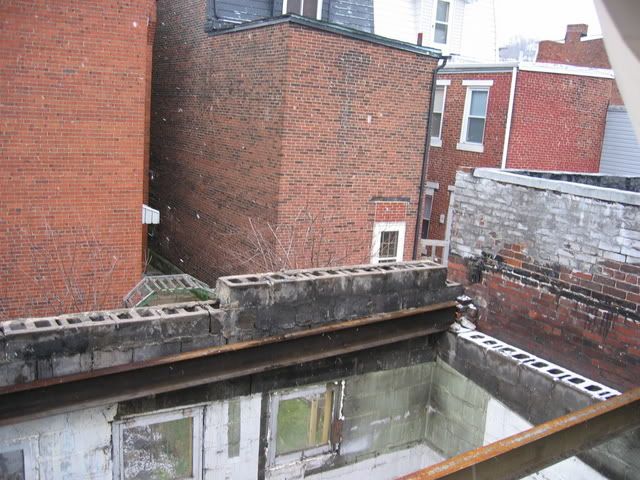
Rooftop view from the back of the building towards the front.

This is a little video I took while on the second floor that shows some of the neighboring backyards etc.
There's a huge, old, run-down police station across the street that I talk about a bit in this video.
Concrete Preparation
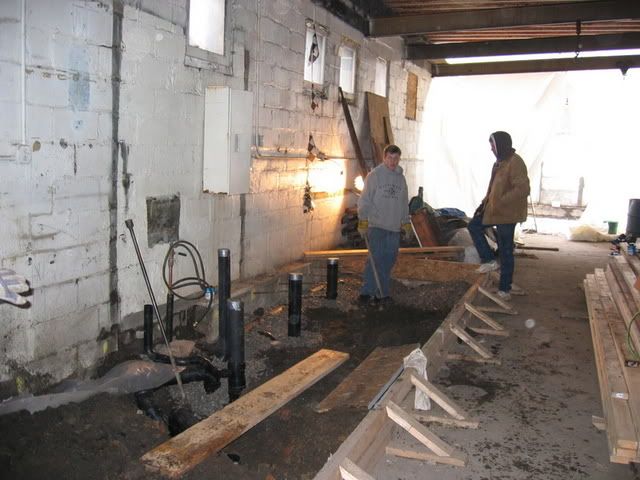
I took these pics a couple weeks later when I stopped by the site with some of my co-workers. All the demolition was complete, all the concrete which needed broken up and removed was gone, the walls for the concrete pour had been constructed, and the framing was being started on top of the side walls.

The concrete that's being poured on the first floor is going to be colored and polished. A dye is added to the concrete when it's being mixed, then afterwards a sealer is added to it and when it's all dry and ready, it's polished smooth. In the end it almost looks like marble. The color I chose is "rawhide".


The concrete that's being poured on the first floor is going to be colored and polished. A dye is added to the concrete when it's being mixed, then afterwards a sealer is added to it and when it's all dry and ready, it's polished smooth. In the end it almost looks like marble. The color I chose is "rawhide".

Contractor Selection and Demolition
December 16, 2006
After getting a three bids on the project, I decided to go with Team Construction. Their bid came in a little bit more than the lowest bid, and a whole lot less than the highest bid. Through her architecture work, my mom's worked with a number of contractors, so she was able to choose only quality people to even give us prices. The owner/head of Team Construction is a guy named.... Guy. He's helped out since the begining of this process a lot, giving advice and approximations of the amount of effort that would go into each one, etc etc. Although this wasn't the only reason we chose to go with Team Construction, it was certainly a factor.
Demolition of the interior and roof of the garage happened within days of signing up with Team. Here are some pictures and video of the initial stages of demolition.


Pics of the original garage
Unfortunately I lost a lot of the pictures of the original garage when I got my computers stolen last summer, but here are some of the ones I do have:
The outside

Yes, that's right... there was an El Camino in there!


The outside

Yes, that's right... there was an El Camino in there!

Here you can see the roof slats which I'll be re-using for the siding on the front of the house. You can also see the large cabinet that must have over 40 drawers that my mom and I are going to refinish. Apparently the cabinet's real wood and should look great when done.

Pictures of the area
Here's an overhead view of the area with a couple local points of intereste pointed out:

And here's a close-up of the imemdiate area:


And here's a close-up of the imemdiate area:

Wednesday, January 17, 2007
Floor Plan Fun
(Note: click images to see them full size)
Floor Plan: 1st Floor:
If you start at the lower far right of this drawing you can see the front door and above that is the garage door. Through the front door you'll be in the entryway where a coat rack will be and the stairs leading to the second floor. Walk past the stairway and there will be a storage closet, then the furnace/HVAC room, then a washer and dryer, then a powder room. This whole area will be "finished" (drywall, heating etc). The rest of the first floor will be "unfinished" and will be a large garage. I should be able to leave room for my car plus a guest's car as well as have a large area for exercise equipment, games, more storage, who knows. At the end of the garage will be a set of sliding glass patio doors leading out into the patio. I was unsure during the planning phase, but once the roof was torn off I determined that the walls around the patio make it entirely private, yet open to the sky. For the time being I'll probably put a picnic table and grill out there, but in the future putting up a couple hammocks or even a hot tub are well within reason.
Floor Plan: 2nd Floor

Going from the first to the second floor, you go up the stairs, they make a right turn, and then you land on the second floor with the bedroom to your right and the rest of the house to your left. My bedroom is a decent size, though not huge. In it there is a window on the left that is in a box which bumps out of the front of the house. This is Sanchez's box so she can look out the window and I plan on getting her a nize fuzzy something or other to sleep on. To the right of that window are two large sliding glass doors which act as a psuedo balcony. There will be a railing in front of them, but it will be attached flat against the house so you can't actually walk out anywhere. The "master bathroom" is off this room. More details of this to come later, but it'll be pretty sweet and it will have a big walk-in-closet right off of it.
If you turn left after you land on the second floor, the kitchen will be to the left with the usual kitchen stuff. I'm hoping to get stainless steel cabinets mixed with wood cabinets from ikea for this, but the exact plan is yet to be determined, and I may end up going a different route. As of right now, the floor in the kitchen will be cork that my mom and I will lay ourselves, but this might get changed to VCT (vinyl composite tiles... sort of like a nice version of linoleum in tile form). Behind the kitchen is another full bathroom and walking past the kitchen will be the livingroom/diningroom/everything else. This will be done in hardwood and against the back wall there is another set of sliding glass patio doors on the left and then on the right is a regular door which will open to the spiral staircase going to the enclosed patio.
Floor Plan: 1st Floor:

If you start at the lower far right of this drawing you can see the front door and above that is the garage door. Through the front door you'll be in the entryway where a coat rack will be and the stairs leading to the second floor. Walk past the stairway and there will be a storage closet, then the furnace/HVAC room, then a washer and dryer, then a powder room. This whole area will be "finished" (drywall, heating etc). The rest of the first floor will be "unfinished" and will be a large garage. I should be able to leave room for my car plus a guest's car as well as have a large area for exercise equipment, games, more storage, who knows. At the end of the garage will be a set of sliding glass patio doors leading out into the patio. I was unsure during the planning phase, but once the roof was torn off I determined that the walls around the patio make it entirely private, yet open to the sky. For the time being I'll probably put a picnic table and grill out there, but in the future putting up a couple hammocks or even a hot tub are well within reason.
Floor Plan: 2nd Floor

Going from the first to the second floor, you go up the stairs, they make a right turn, and then you land on the second floor with the bedroom to your right and the rest of the house to your left. My bedroom is a decent size, though not huge. In it there is a window on the left that is in a box which bumps out of the front of the house. This is Sanchez's box so she can look out the window and I plan on getting her a nize fuzzy something or other to sleep on. To the right of that window are two large sliding glass doors which act as a psuedo balcony. There will be a railing in front of them, but it will be attached flat against the house so you can't actually walk out anywhere. The "master bathroom" is off this room. More details of this to come later, but it'll be pretty sweet and it will have a big walk-in-closet right off of it.
If you turn left after you land on the second floor, the kitchen will be to the left with the usual kitchen stuff. I'm hoping to get stainless steel cabinets mixed with wood cabinets from ikea for this, but the exact plan is yet to be determined, and I may end up going a different route. As of right now, the floor in the kitchen will be cork that my mom and I will lay ourselves, but this might get changed to VCT (vinyl composite tiles... sort of like a nice version of linoleum in tile form). Behind the kitchen is another full bathroom and walking past the kitchen will be the livingroom/diningroom/everything else. This will be done in hardwood and against the back wall there is another set of sliding glass patio doors on the left and then on the right is a regular door which will open to the spiral staircase going to the enclosed patio.
Tuesday, January 16, 2007
Floor Plan Time
(Note: Click all pictures to see a larger version)
Front Elevation:

The part that says "wood siding" will be done using old slats from the cieling of the original garage. The windows and doors will all be mill finish aluminum, meaning they will be unpainted with that smooth/rough metal like brushed aluminum sort-of. The wood sections around the windows on the second floor bump out from the rest of the building a foot and a half or so. After some debate I chose to use corrugated steel as the main siding for the house. I had/have some reservations about using this because it's being used in many other modern houses these days, so I hated to do something unoriginal, but in the end I decided that it really is the right thing to use to achieve the industrial look that I'm going for.
Back Elevation:

Not shown is that the first floor in the back will be concrete block, like the rest of the first floor, and the second floor will be in the same corrugated steel siding as described above. All doors and windows will be mill finish here as well. If it's not obvious, the pole and horizontal lines on the left hand side indicate a spiral staircase going from the back patio to the second floor.
Side Elevation:

Because the garage takes up nearly the entire property, I made an outside area by removing the roof over the last 16 feet and building a wall in what was previously inside the garage. This side elevation shows that the second floor doesn't take up the entire length of the building, but stops at this outside patio.
Monday, January 15, 2007
The Real Planning Begins

One thing I realized I haven't discussed up to this point is my mom's exact role in the project.
She works for Tai + Lee Architects and although not technically an architect she does most things a "real" architect does. Without her help and knowledge, none of this would have been possible (at least not with spending tens of thousands of dollars), and the end result would've been far less personal.
Although my mom and I had a pretty good idea of how the floor plan and general layout of the garage was going to be, now that we had the final legal approval it was start ironing out the details of the floor plans. Some of the big items in this area were:
- Window selection and layout
- Exterior siding type
- Flooring
- Skylight positioning
Tuesday, January 9, 2007
The Legal Battle
I will do my best to keep this portion of the story brief, but no promises.
*September 2005*
After working out a price with the sellers of the property, my mom and I went to the zoning board and scheduled a time a month from then to come in and present my case to the Zoning Board. Prior to this hearing, a notice must be placed on the property to inform neighbors that the owner of the property is requesting a variance from the zoning code. This allows neighbors to attend the hearing and object to changes that they may think will negatively impact them.
*October 2005*
3 women from the neighborhood showed up at the hearing to object to my proposed plans. The unfortunate thing about this was that going into the hearing they knew nothing about my plans, nor did they pay attention at the hearing when my mom was going over the plans we'd come up with. My intention was to create a place for myself to live while at the same time rehabilitate an under-used piece of property. Instead, I was vilified to be an absentee landlord trying to make a quick buck by creating rental property on the Southside bandwagon. Considering some of the other crappy housing in the area, I can understand why they might have had reservations initially. However, after seeing that I was working on the project with my mother and listening to my reasons and visions for doing it, they still blindly objected, leaving my extremely frustrated.
The Zoning Board agreed and sympathized with me and after a couple of weeks I got notice that my request for a variance had been approved. At this point I began the various inspections which are customary before closing a real estate deal like radon, pest, building, etc. Everything seemed to be in order so in early December I set the date to make the actual purchase of 7 Uxor Way....
*December 2005*
Two days before this day came, I received notice in the mail that one of the neighbors who attended the hearing and her husband (a lawyer (!!)) were appealing the Zoning Board's decision. Should they win this case, I would no longer be allowed to build the 2nd floor addition. I immediately called off the closing and requested an extension of the sales agreement. After hours and hours of phone calls to city offices I determined that this process could take months and that indeed, if I started construction and the neighbors won their case, I would have to tear down the new construction.
My mom and I went back to the drawing board, trying to figure out a way to do the project as a one-story structure. In the end we did come up with a plan, but it was limited in many ways. Time was progressing and I needed to figure out whether I should go forward and risk purchasing the garage or let the neighbors win. After being advised by persons familiar with similar cases that the neighbors had little chance of overturning the Zoning Board's decision, I decided to go for it. Worst case scenario being that I would not be allowed to build anything and would have to re-sell it without altering it.
*August 2006*
9.5 months and a couple thousand dollars later the "few month" legal process was complete and the judge declined the neighbors' appeal, clearly stating that not only were their reasons for appeal not valid, but that there was precedence in previous state supreme court cases which stated that I didn't even need to get a variance to build vertically on an existing wall structure anyways! *sigh* oh well... it was an interesting process none-the-less. I could go into obscene amounts of detail about how I chose to go about defending myself in the court process and the reasons why their case was most likely just BS scare tactics, but at this point, it's time to get to the reason this blog was created: to keep a running log of the project itself and so people can track what's been going on. Although I'm still not "up to date", I promise that the next entry will have some real info on the garage (including pictures, w00t!) and what's being done to it. Till then... my bed awaits.
Monday, January 8, 2007
The Search Continues, and Uxor Way is found
After the detective agency, my mom and I looked through realty websites ourselves at first, but then began talking with Maureen States, a real estate agent for Neighborhood Realty in Regent Square right by my apartment and my parents' house.
To start with we looked at some regular houses in the Regent Square, Edgewood and Southside areas in case I changed my mind and wanted to do something more traditional. After looking a bit I still wasn't struck by anything. One day Maureen called very excited and told me she'd found the perfect thing for me. When I went to see her to take a look at the documents she'd printed out it turned out it was a large 20' x 72' garage that my mom and I had seen online before in the Southside but had dismissed it without looking at it closely.
We went and looked at it in person and my initial reaction was "it's really cool, but it's not big enough". My mom and Maureen though though it was plenty big and that I was crazy. At the time I envisioned having a work-out room, a studio room, a bed room, a TV room, an outside area, a roof deck etc etc. After we'd looked at it my mom and I drew it up a little and began to feel a bit better about it, though still a bit unsure. A little while later we went and revisited it and an architect friend of my mom's who live in the Southside nearby named Andrew Lang stopped by to check it out with us. He instantly could see its potential and had a very different plan than what we'd imagined: don't live in the garage portion... live above it. It was such a simple and obvious solution to a number of the problems we were stuggling with. Adding a second floor made significantly more room, allowed for light to be let in, left room for several parking spots and just gave much more flexibility and total worth to the end result.
The only two major downsides we saw to the property at this point was the fact that it's located in an alley and the difficulty of building the second floor. The alley it's in is one way, very narrow and allows parking on one side. It's narrow to the point that you definitely want to turn your mirror in when you park on it to avoid it being smacked off. It's a bit difficult to manuever down at first, but over time it's not a problem, and the other advantage of this is that it cuts down on traffic. If I go to sell it in the future, I imagine this aspect will scare some people away.... hopefully not everyone though :P
The other issue of building the second floor was difficult because of a zoning code which states that you are not supposed to build on the property line and walls of structure must be 5 feet set-back from the property line. The purpose of this is to avoid fires spreading from one building to the next. This law is fairly new, and so most buildings in the Southside, and many other areas do not adhere to it. Another code which is broken in many instances in the city is that you cannot add windows to walls already built on the property line, because again, it facilitates the spread of fire from one building to the next.
In her work my mom's dealt with situations like this where a code restrict a project and she knew that to get around this, we would need to get a variance from the City of Pittsburgh Zoning Board. Once I made the call that I did want to go forward with purchasing the building we spoke with Maureen and got her to write in our ofher to the seller of the garage that our purchase of the property would be contingent on me getting the approval to build the second floor. After agreeing on a price, the legal process began....... more on this to come soon.
Subscribe to:
Posts (Atom)
